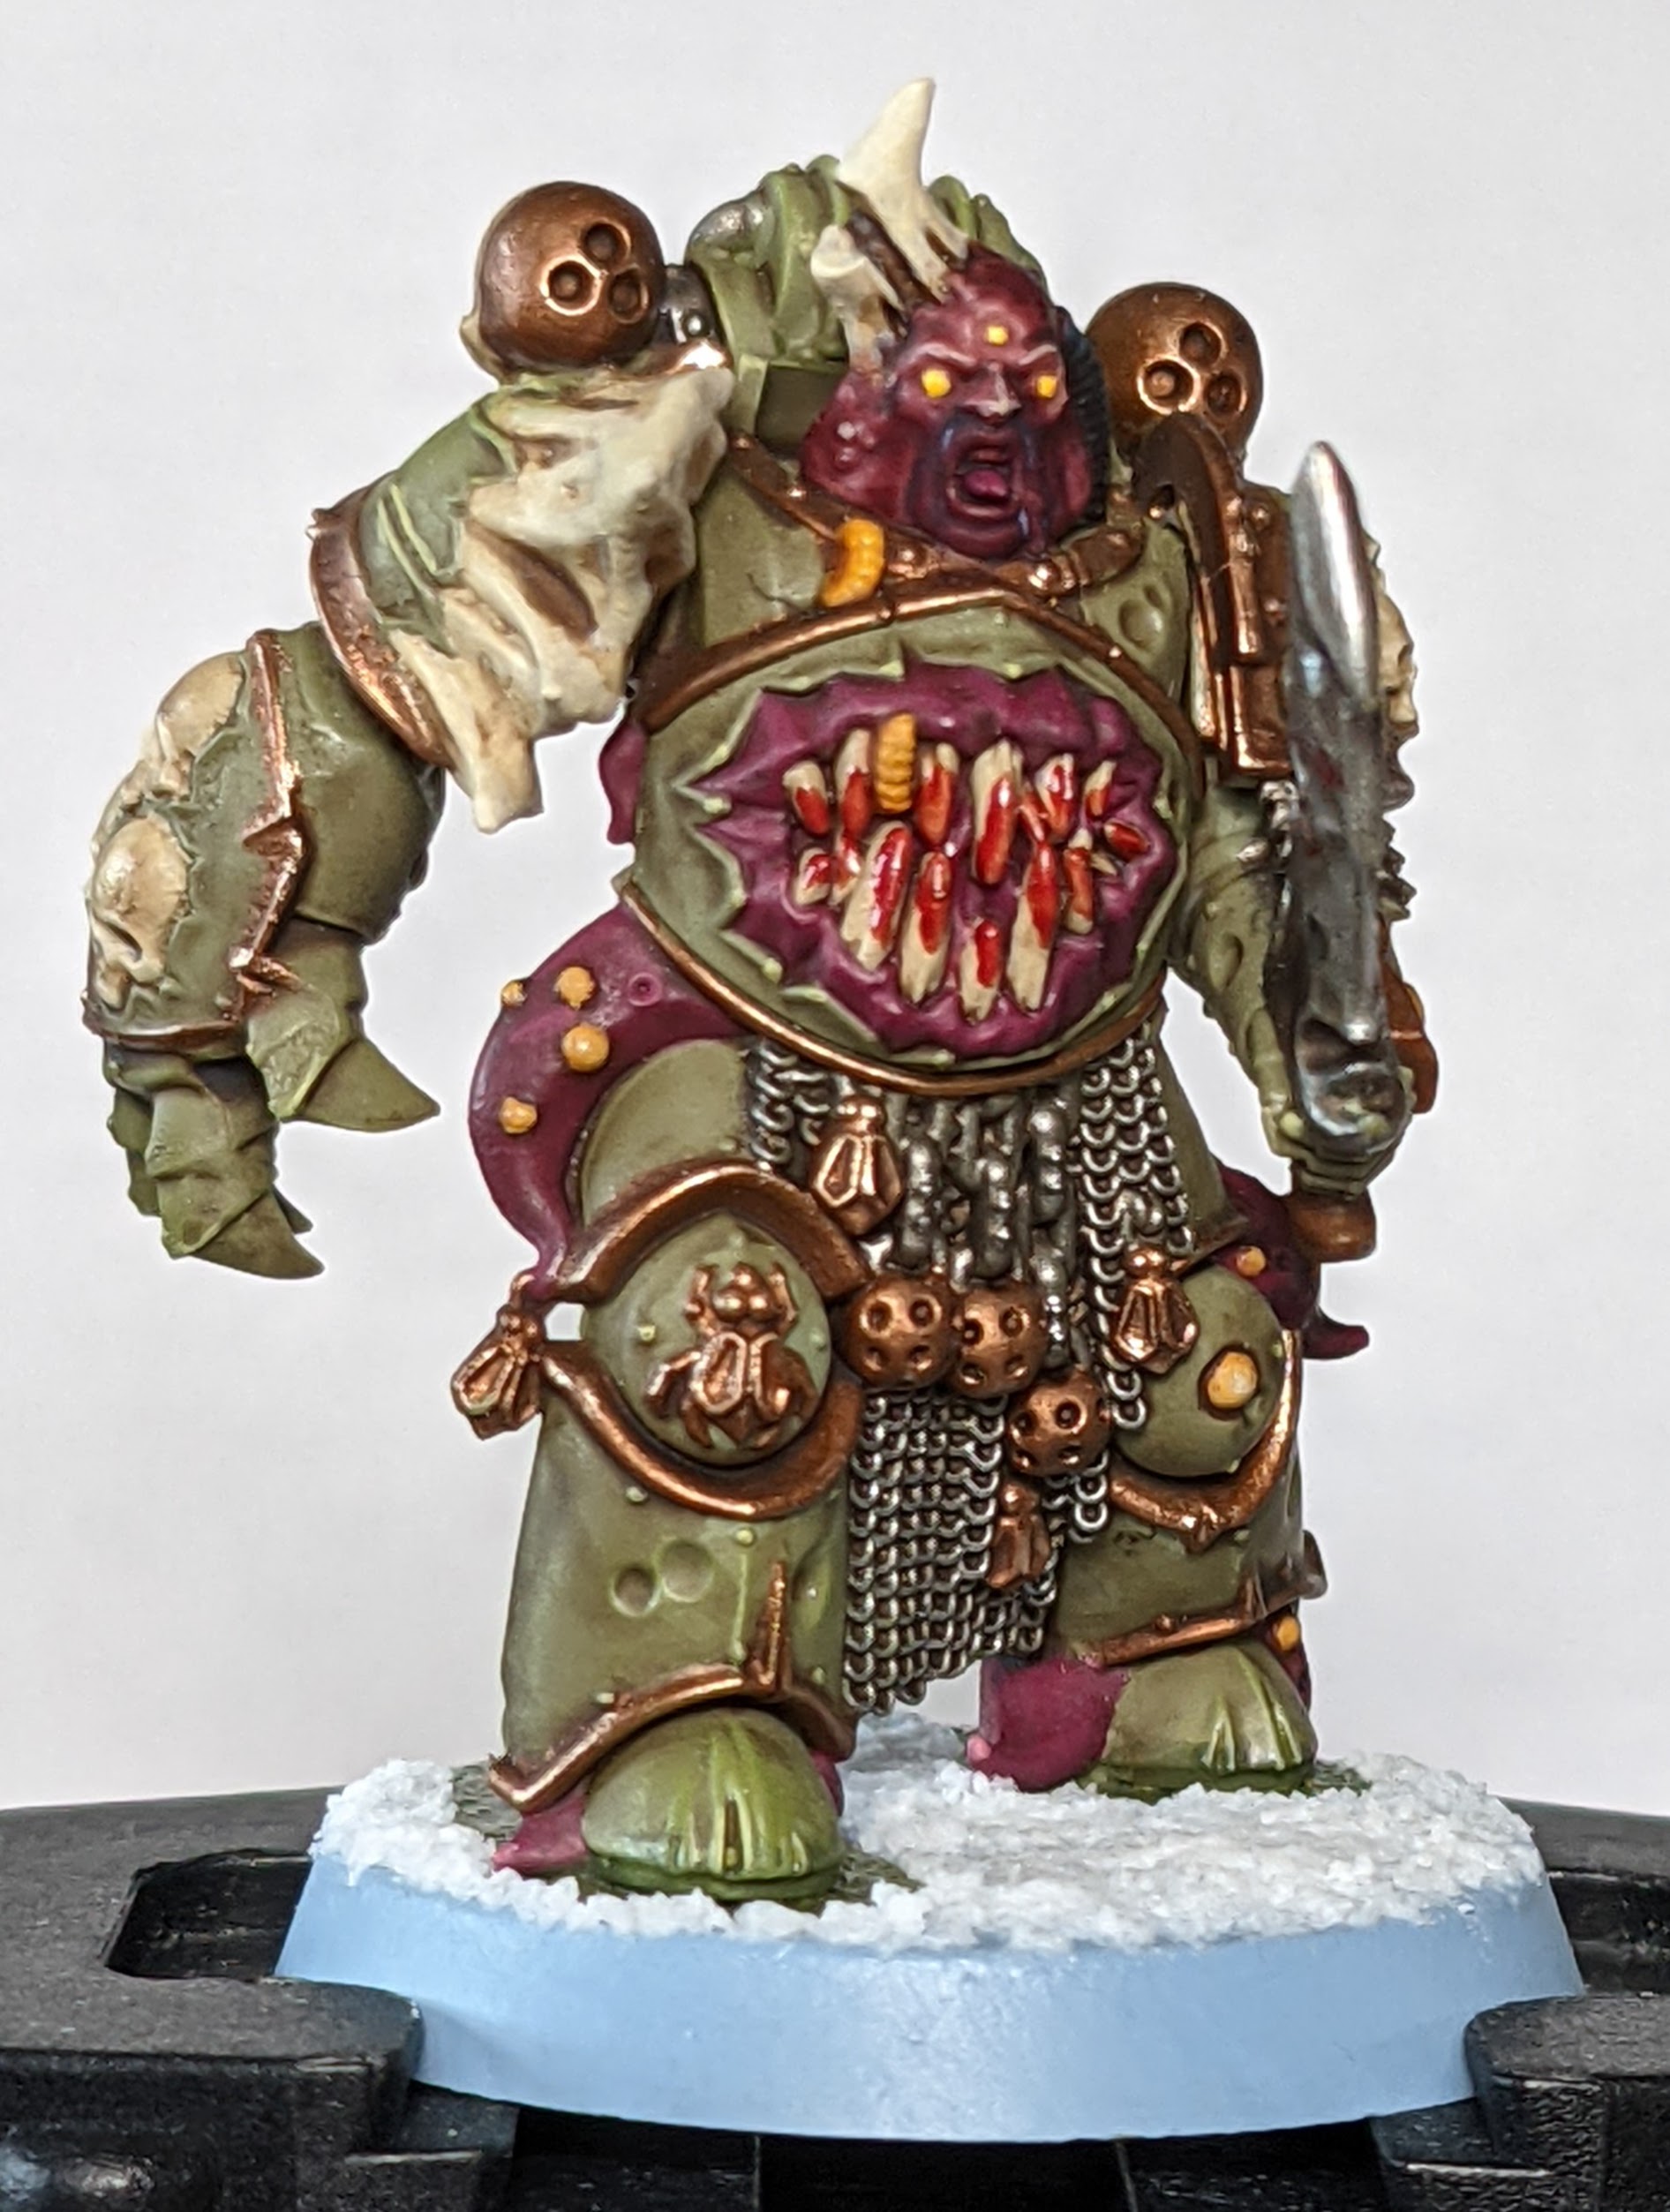
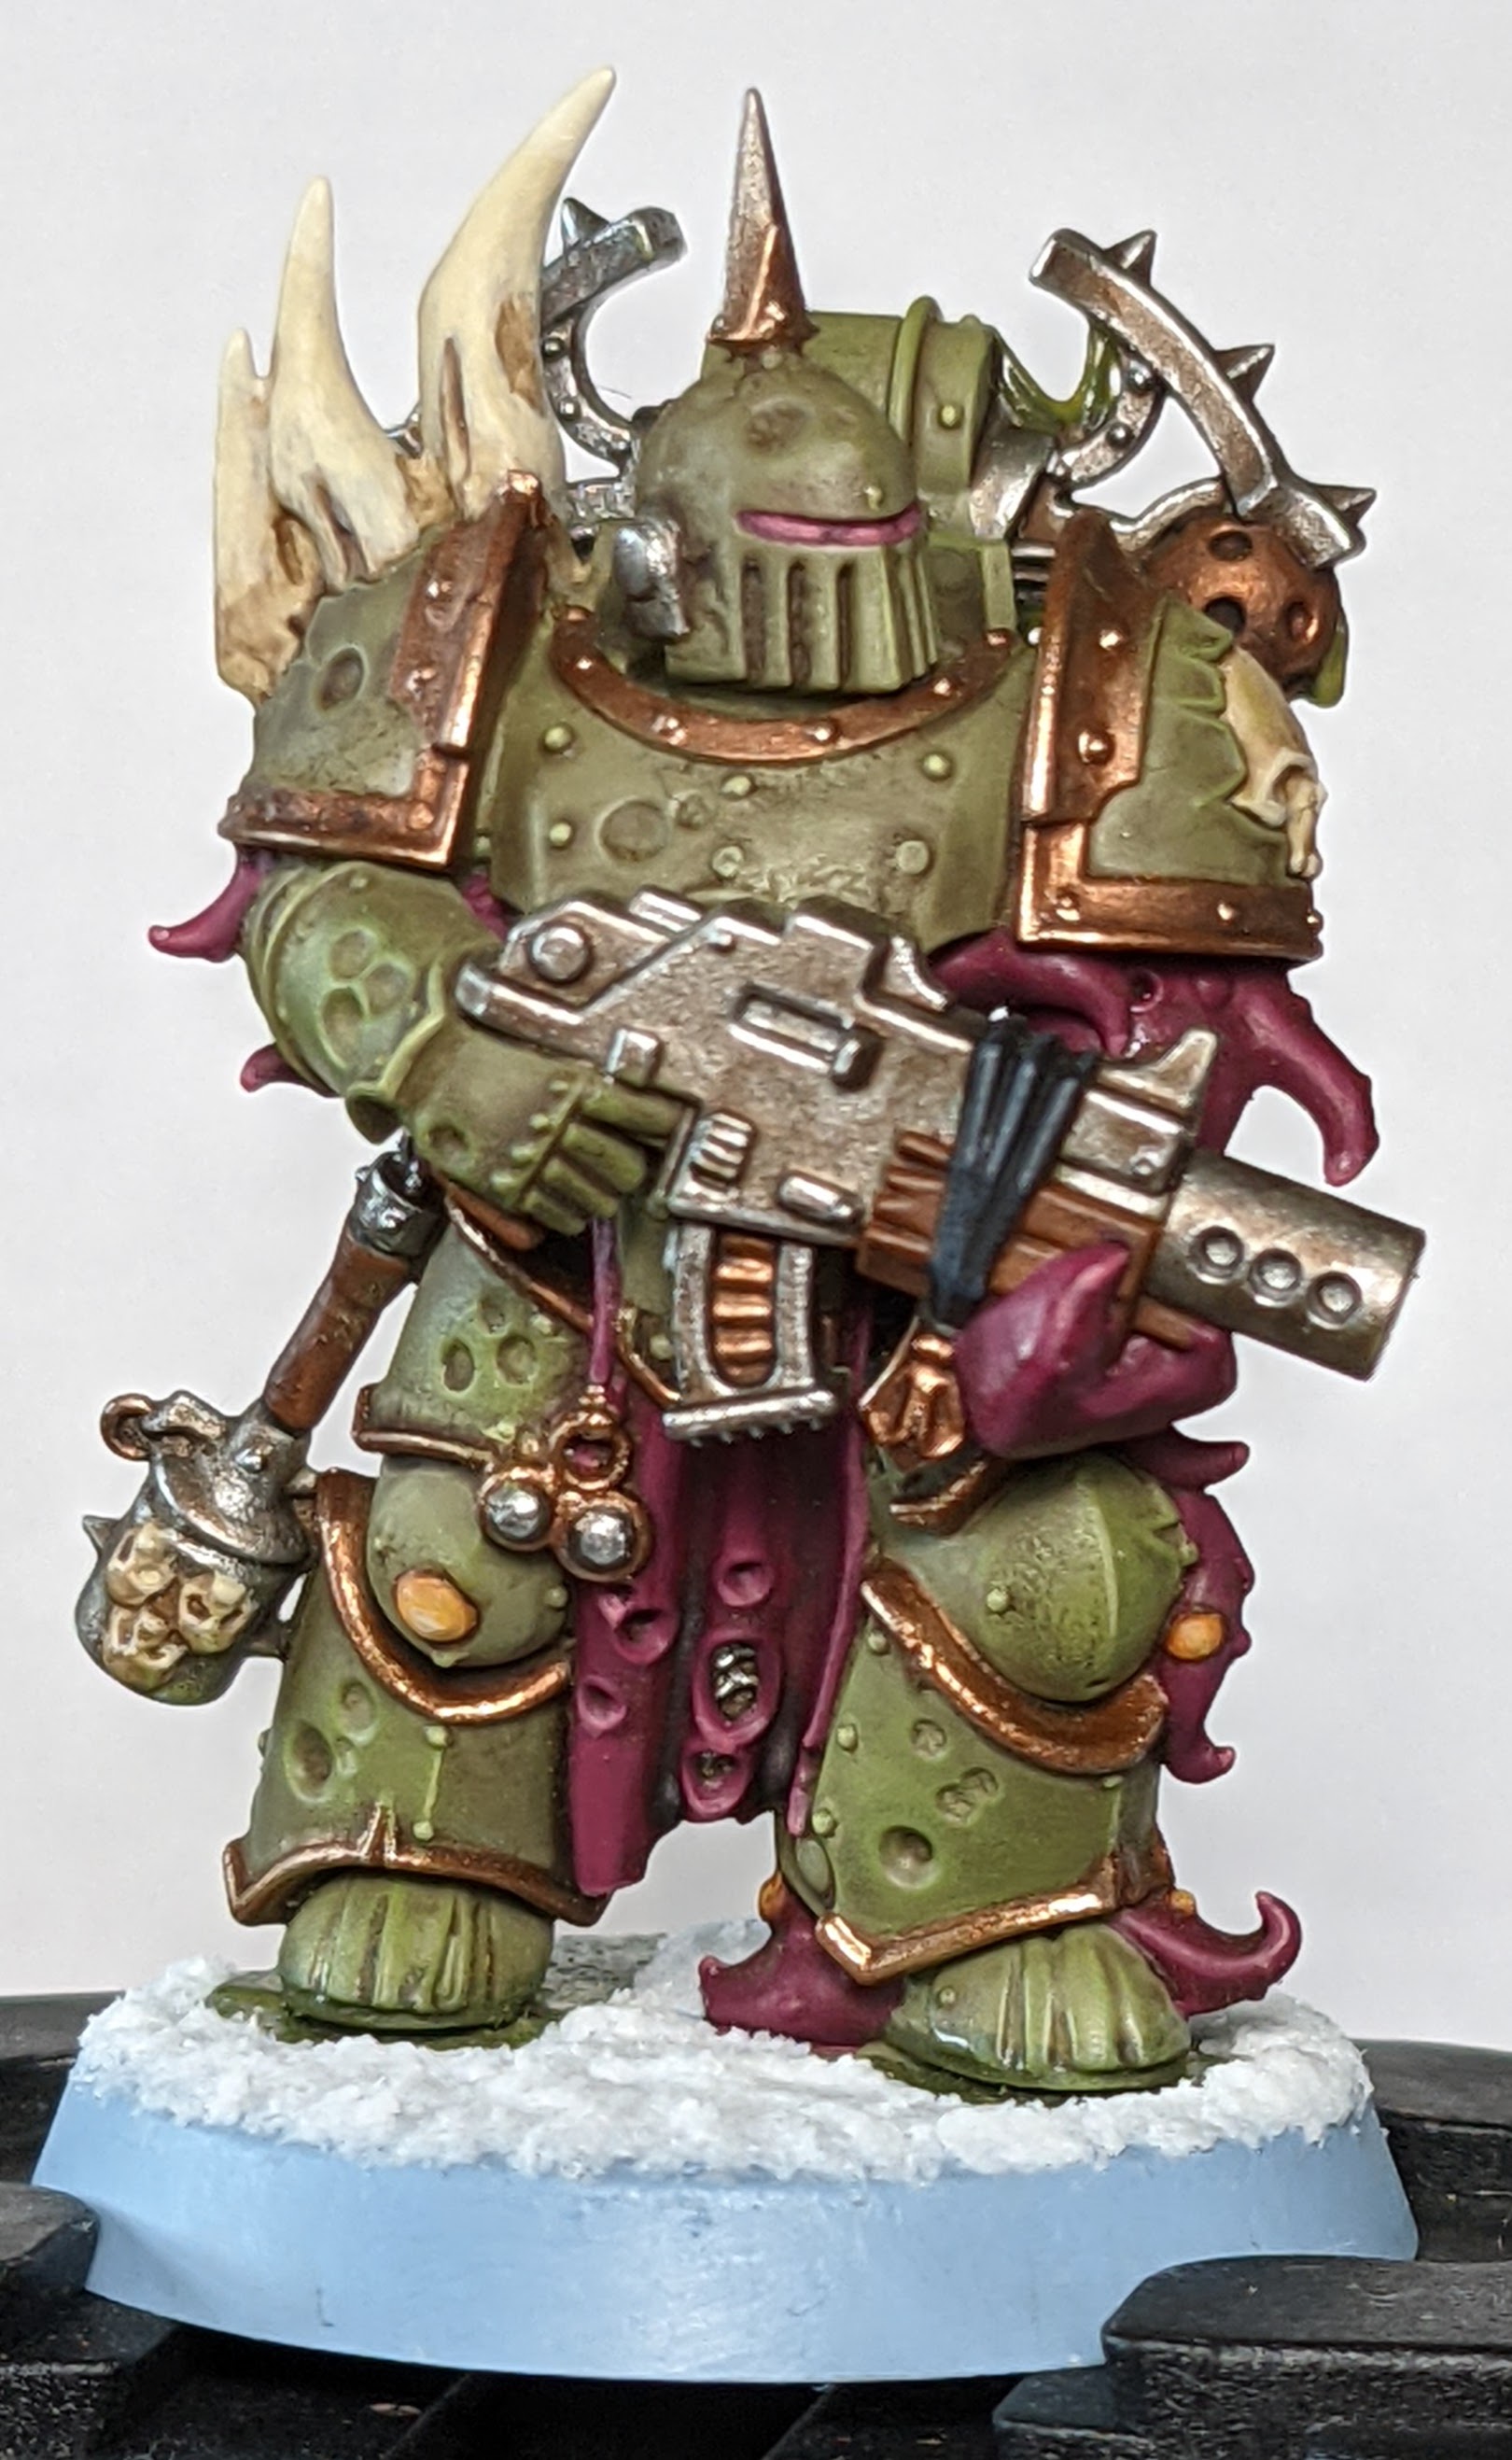
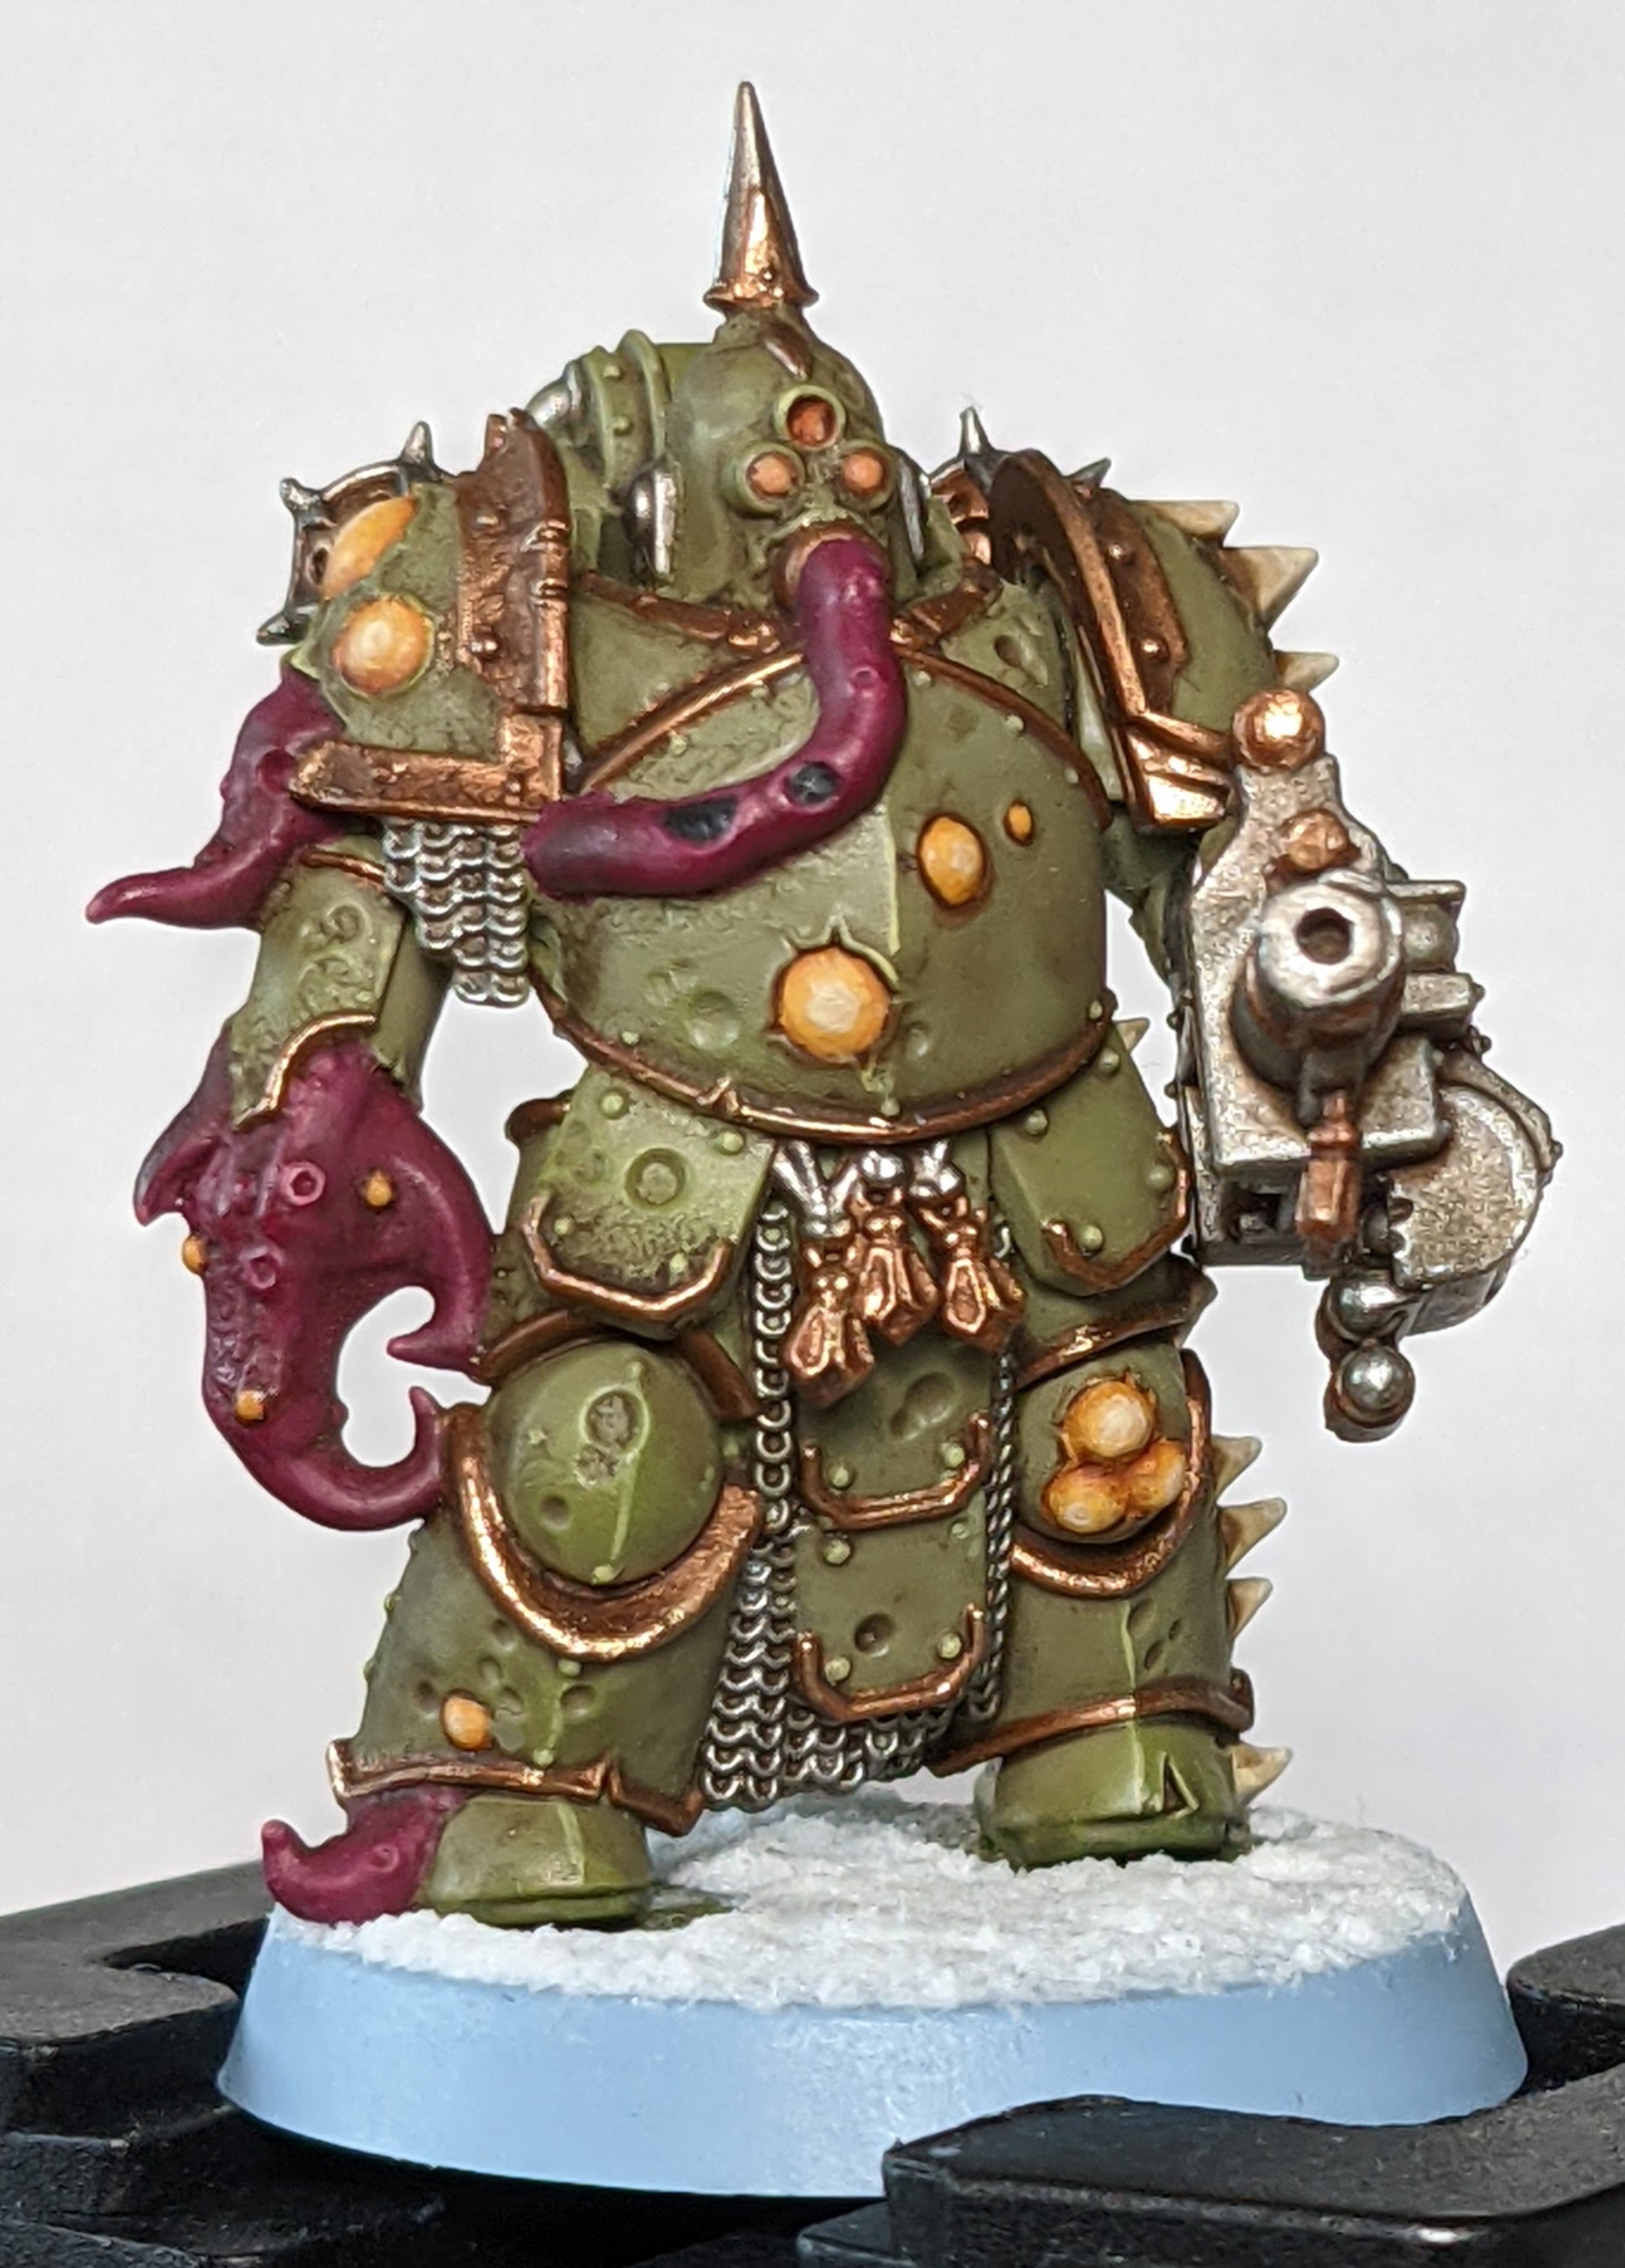
Photos Link to heading
More photos and three short videos!
Resources Link to heading
- How to Paint: Lord of Contagion
- Example Death Guard on GW
- HOW TO PAINT: Plague Marine Reinforcements
- How to Paint: A Pallid Hand Plague Marine - completely different colours for the armour, but the Nurgle tentacle parts might be useful.
- How to Paint Death Guard:
Nurglings
- Casandora Yellow looks like a good substitute for Iyanden Yellow
- Screamer Pink probably works instead of Volupus Pink.
- How to Paint Death Guard: Foetid Bloat-drone Flesh
- How to Paint Battle Ready Death Guard
- How to Paint Death Guard: Speed Painting Poxwalkers
Paints used Link to heading
- Death Guard Green primer
- Base
- Death Guard Green for fixing mistakes
- Leadbelcher
- Balthasar Gold
- Screamer Pink
- Ushabti Bone
- Averland Sunset
- Castellan Green
- Mournfang Brown
- Corvus Black
- Abaddon Black
- Bugman’s Glow
- Shade
- Agrax Earthshade
- Carroburg Crimson
- Druchii Violet
- Reikland Fleshshade
- Layer
- Elysian Green
- Sycorax Bronze
- Ironbreaker
- Dark Reaper
- Kislev Flesh
- Ogryn Camo
- Pink Horror
- Screaming Skull
- Fenrisian Grey
- Yriel Yellow
- Technical
- Nurgle’s Rot
- Nihilakh Oxide
- Blood for the Blood God
- Valhallan Blizzard
Subassemblies Link to heading
These models are far easier to paint if you apply the base paint before fully assembling the models. Definitely keep all the backpacks off; also keep off any arms that will be close to or blocking the body.
Mounting Link to heading
I mounted the subassemblies like this:
- Slice the cork from a wine bottle into 1cm sections.
- Glue each section onto a spare base (e.g. Citadel 32mm Round Bases) using superglue; mounting on spare bases allows you to use your painting handle.
- Straighten out a paperclip and cut it into 3cm or 4cm sections - you need the subassembly to be far enough away from the painting handle that you can get the brush in at the underside.
- Drill one or preferably two holes in each piece somewhere they won’t be seen when the model is assembled, e.g. the middle of the backpack, or the posts on the arms that plug into the body. Two holes means the subassembly won’t rotate when you’re painting it - this is very annoying when it happens :( The hole needs to be slightly bigger than the paperclip so that you can wiggle the paperclip around when taking the subassembly apart later. The Citadel drill is the right size if you can get hold of one.
- Put some superglue in one of the holes you drilled, push in a piece of paperclip, hold until set. I tried plastic glue and it didn’t work at all - I needed to use superglue. Repeat with another paperclip piece and the second hole on that subassembly.
- Push the other end of the two paperclip sections into the cork on the spare base.
- Repeat until all the subassemblies are mounted.
Now you can easily paint your subassemblies.
Prepare for priming Link to heading
Before priming I covered the peg holes with bluetac and covered the pegs with masking tape. I don’t know if this was necessary but I wasn’t taking any chances :) I left the bluetac and masking tape on until I finished applying the base coat, which was a mistake - the masking tape came off easily but the bluetac took a really long time to clean off, so I would clean that off immediately after priming in future.
Unmounting Link to heading
To unmount the subassemblies I gently wiggled the paperclip sections around until they loosened enough to pull out. Only one paperclip section took much effort - the other paperclip sections came off within 5-10 seconds. If the paperclip section that was hard to remove had taken much longer I probably would have cut it just above the surface of the model; I am concerned that if I had done that the paperclip might have protruded and prevented the piece from sitting properly :(
Undercoat Link to heading
- Death Guard Green primer
Base coat Link to heading
Apply in roughly this order:
- Armour: Death Guard Green (already done with the undercoat)
- Silver parts: Leadbelcher
- Metal trim: Balthasar Gold; there are small gold pieces on top of the chainmail, so do gold after silver.
- Cloaks and loincloths: Screamer Pink
- Tentacles: Screamer Pink
- Bone, skulls, big Nurgle teeth, and horns: Ushabti Bone; will need 3+ coats for full coverage; (videos use Wraithbone)
- Boils: Averland Sunset (Flesh/Boils in app)
- Slime: Castellan Green
- Melee weapon handles: Mournfang Brown
- Armour Joints:
- I used Abaddon Black, but I would most likely use Corvus Black in future
- Don’t layer on too heavily, a lighter coat is better
- Hoses: Abaddon Black
- Pipes: Leadbelcher or Screamer Pink depending on location
- Brown-ish flesh (e.g. bare head): Bugman’s Glow (Inflamed Flesh in Citadel Paint App)
- Worms: Yriel Yellow or Averland Sunset
Shade Link to heading
I recommend fully assembling the model before shading so the shade is more consistent across the model. It will be hard to highlight some spots, but those spots will be harder to see, so it’s less of a problem.
- Agrax Earthshade nearly all over - avoid flesh, boils, and any other places that get a different shade.
- Brown-ish flesh:
- Carroburg Crimson; probably need several coats
- Shade a smaller area with Druchii Violet - I applied several light layers around the mouth to make it stand out from the rest of the head
- Boils: Reikland Fleshshade; probably need several coats; heavier in the recesses.
Highlight Link to heading
- Armour:
- Dry brush with Elysian Green
- Do this immediately after shading because it’s messy and will splatter other parts of the miniature
- Try your best not to hit other colours, but you’ll be highlighting most of the areas you damage anyway, so it’s not too bad
- Cloaks and loincloths:
- Screamer Pink everywhere except the recesses; see How to Paint: Lord of Contagion (timestamped)
- Brass: Sycorax Bronze
- Leadbelcher: Ironbreaker, because it’s not as bright as Stormhost Silver
- Black: Dark Reaper on the raised parts
- Tentacles/Screamer Pink: Screamer Pink; this will be very organic and the shape of the tentacle will influence it
- Bone, skulls, big Nurgle teeth, and horns: Ushabti Bone
- I found the horns were hard to get right and were a very organic process; I ended up covering a lot of the horns, I left the recesses and the lower part of the horn shaded and layered most of the rest
- Edge highlight: eye sockets, teeth, edges and tips of horns
- Boils:
- Averland Sunset over most of the boil, keep it out of the recesses
- Try not to make it clearly defined - aim for more natural and uneven
- Apply two or three (depending on the size of the boil) successively smaller coats so it builds in intensity in the centre
- Slime:
- Castellan Green
- Several coats of Nurgle’s Rot, with more on the areas where slime would be collecting e.g. the bottom of a ball of slime
- Mournfang Brown: layer with Mournfang Brown
- Brown-ish flesh: layer with Kislev Flesh
- Worms: Yriel Yellow or Averland Sunset; I found it was hard to only hit the raised parts
Extreme highlight Link to heading
- Armour: edge highlight with Ogryn Camo
- Cloaks and loincloths: Pink Horror on the raised details - edges and creases
- Brass: maybe touches of Nihilakh Oxide? I didn’t use this, but it might be nice
- Tentacles/Screamer Pink: Pink Horror on tips of tentacles
- Bone, skulls, and horns: Screaming Skull on tips of horns
- Big Nurgle teeth: Blood for the Blood God on some of the teeth
- Boils: Ushabti Bone on the centre of the bigger ones, should look like they are about to burst
Base Link to heading
- Fenrisian Grey on the rim and where there will be snow. I needed at least 3, probably 5 coats for full coverage; maybe starting with a layer of Celestra Grey or The Fang would have been easier?
- Castellan Green around the feet and for tracks behind the model where the feet would have moved and the snow destroyed
- Two or three layers of Nurgle’s Rot on the Castellan Green
- Valhallan Blizzard over the Fenrisian Grey; this should be the very last thing done because any splashes from the model will really show up on the white
Details Link to heading
- Eyes: Yriel Yellow or Averland Sunset or Screamer Pink
- Weathering:
- Maybe Nihilakh Oxide?
- Snow doesn’t really lend itself to weathering in this case, because the Death Guard are destroying the snow as they pass, so it wouldn’t make sense for snow to be sticking to them
- Chipping and battle damage? I didn’t do any, maybe in the future?